 Visual & Installer - Features
Tweet
Visual & Installer - Features
Tweet
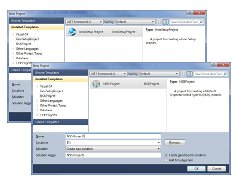
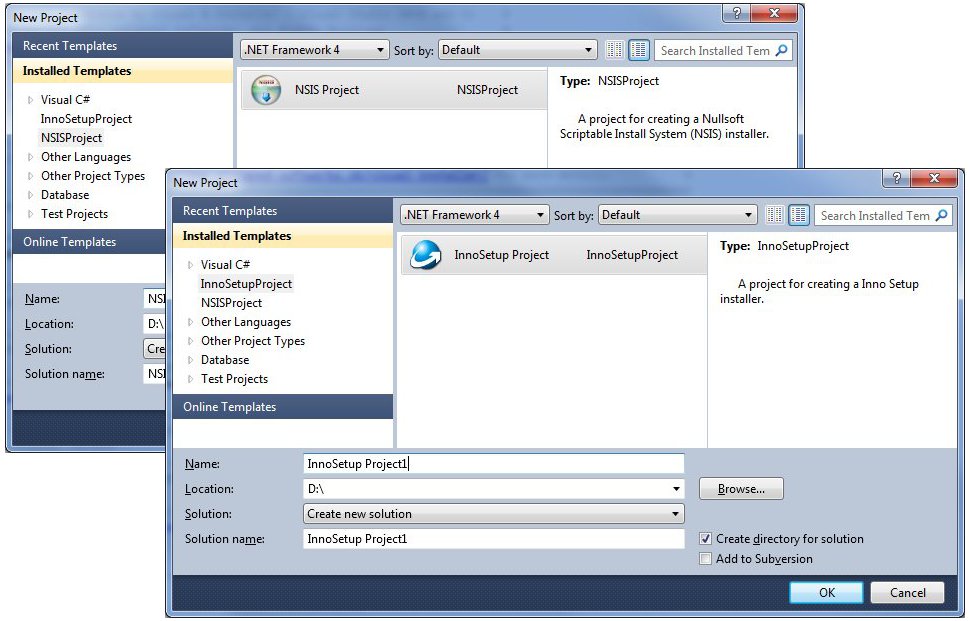
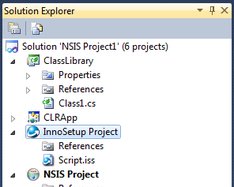
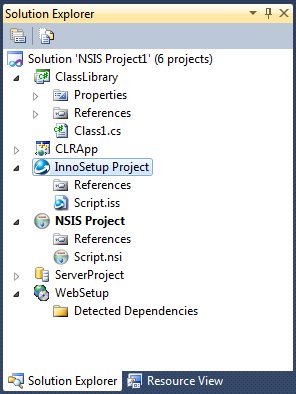
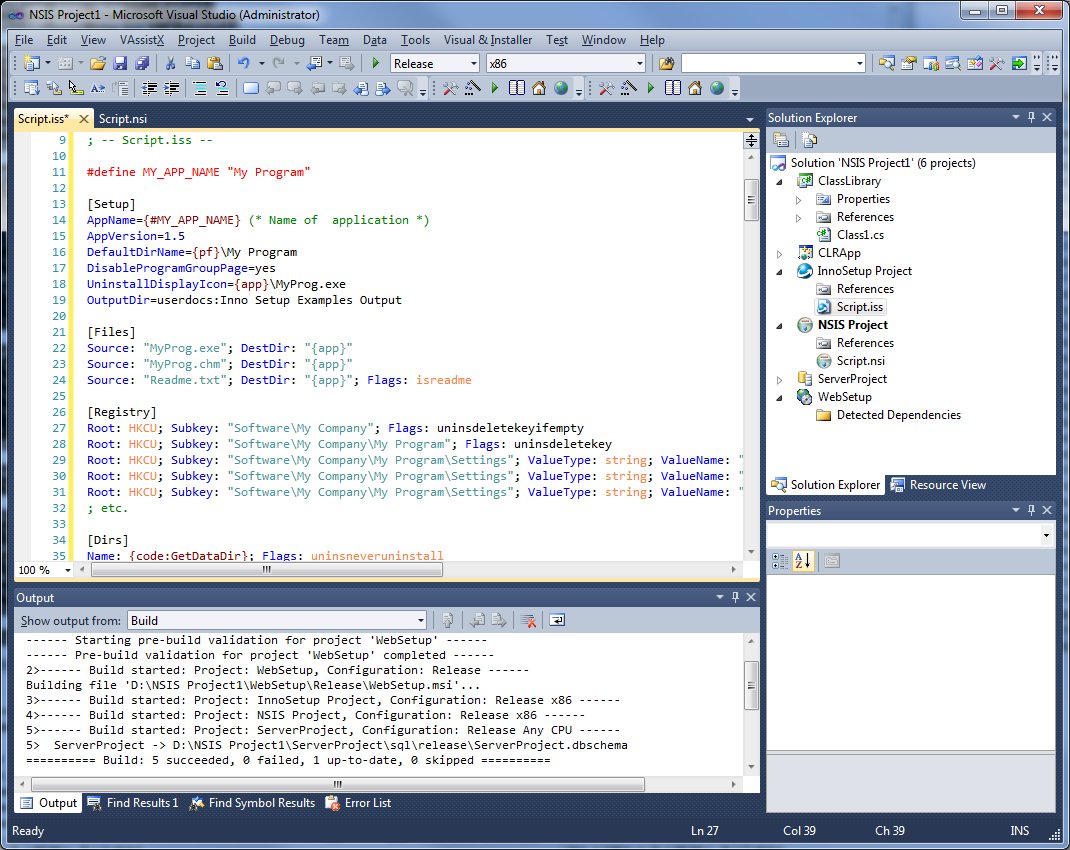
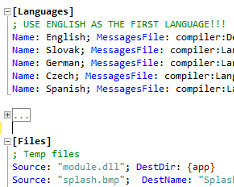
New project types: NSIS Project and Inno Setup Project
Visual & Installer brings two new project types into Visual Studio:
 NSIS Project
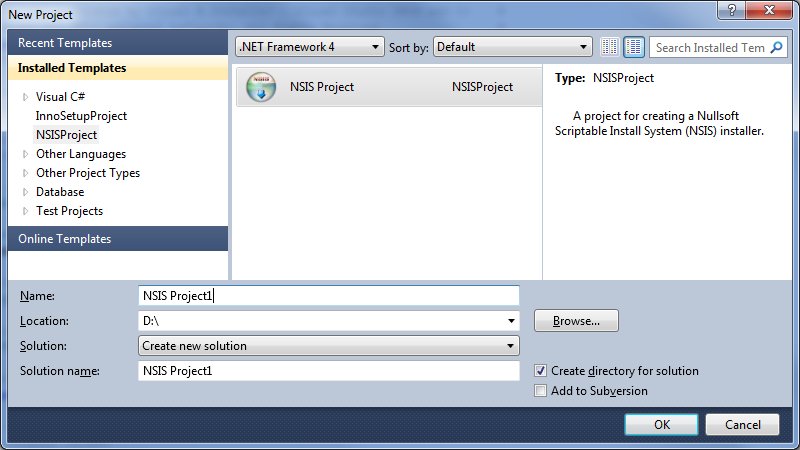 NSIS Project
and
NSIS Project
and  Inno Setup Project
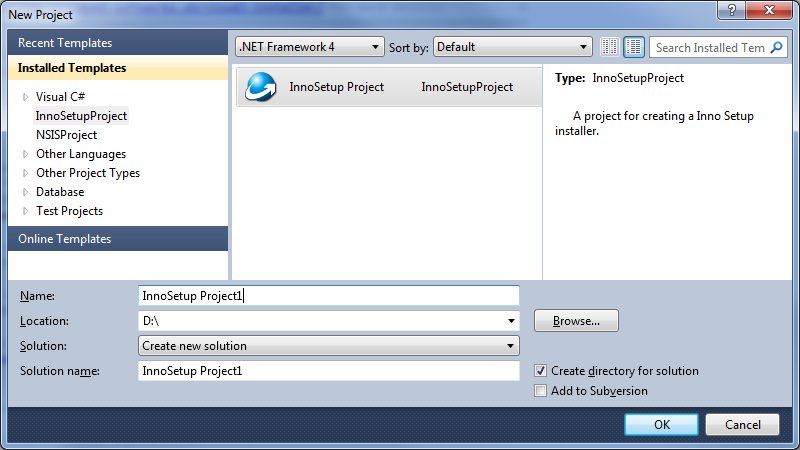 Inno Setup Project .
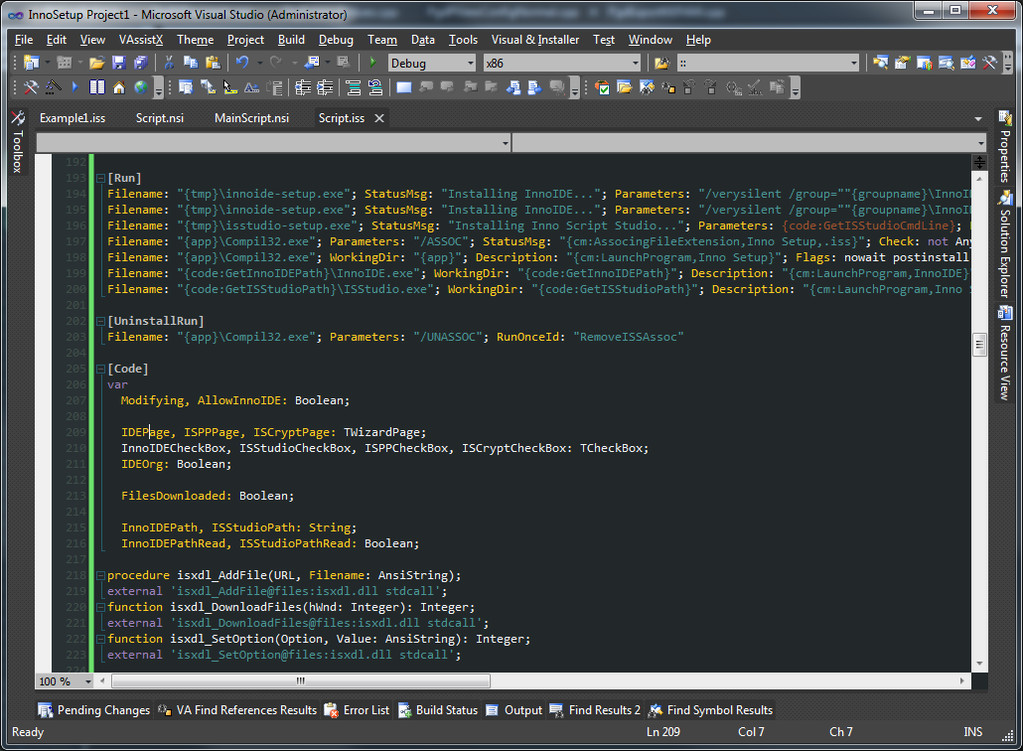
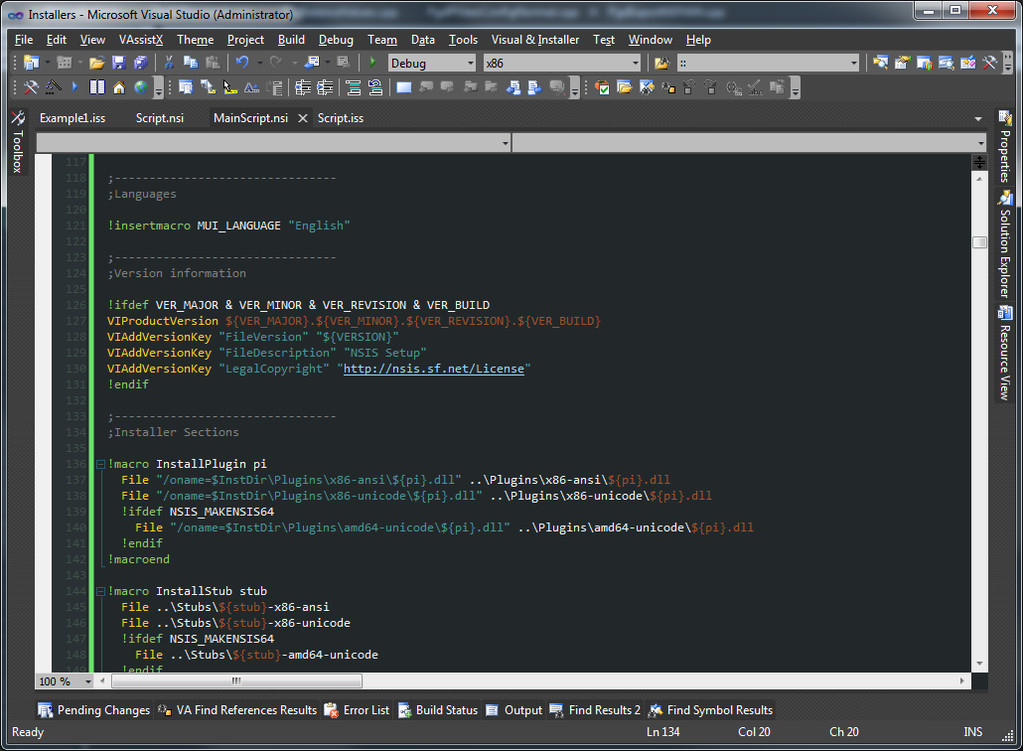
NSIS Project (.nsisproj) allows you to create NSIS (Nullsoft Scriptable Install System) scripts (.nsi/.nsh files) and build awesome NSIS installers.
Inno Setup Project (.innoproj) allows you to develop famous Jordan Russel's Inno Setup scripts (.iss files) and build powerful Inno Setup installers.
Each project contains it's own language: NSIS language and Inno Setup language which are equal to other Visual Studio languages (C#/C++/JavaScript/...) and offer all functionality.
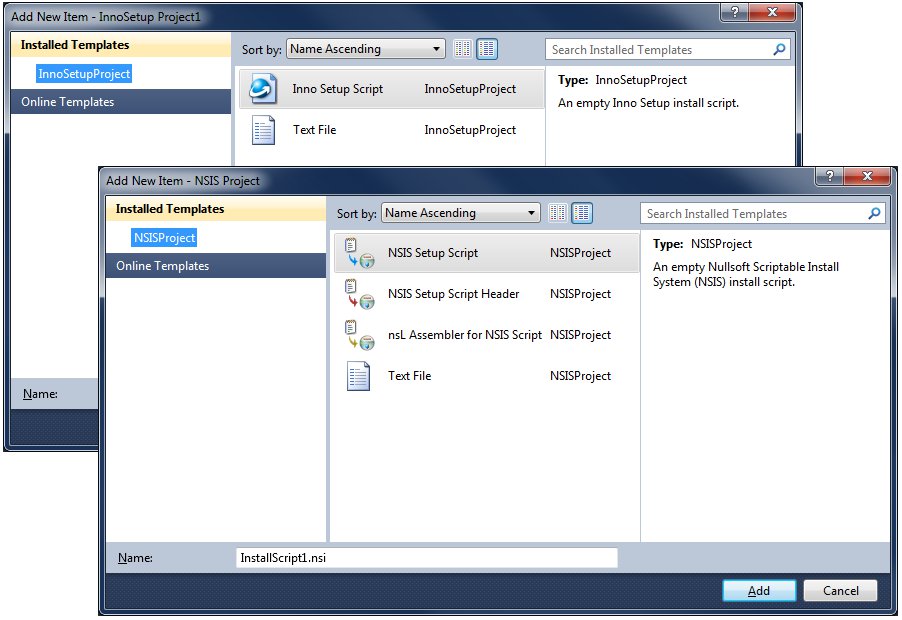
New items for NSIS Project and Inno Setup Project
With Visual & Installer you can have all your installer's files together in one solution.
You can create and add to your project several different items and compile them into single installer - or into several ones - it is up to your decision.
Currently NSISProject supports NSIS Script files (.nsi), Header files (.nsh), nsL Assempler files (.nsl) and Text files (.txt).
The same applies to Inno Setup Project where Inno Setup Script files (.iss) and Text files (.txt) are supported.
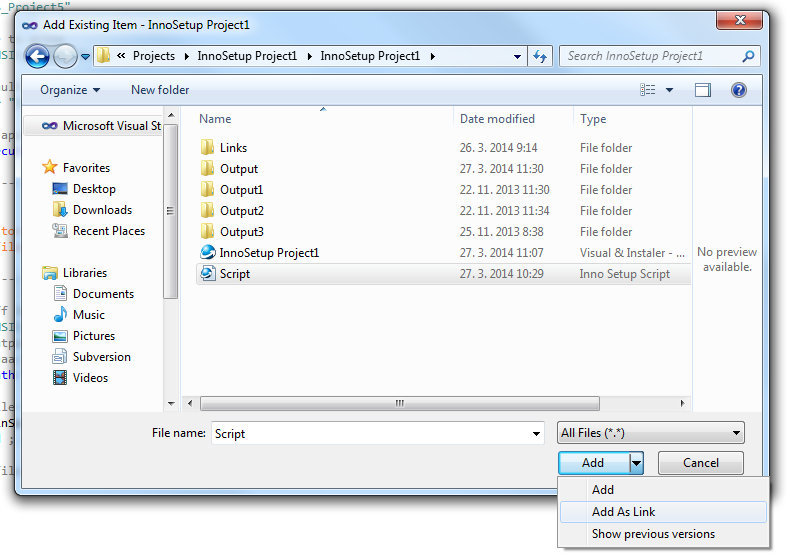
Adding files as link to NSIS Project and Inno Setup Project
Sometimes you have a script file with some useful routines you want to use in your project. But this file is part of another project and you do not want to copy it to new project or to maintain two files.
Solution: add file into project as Link - file stays in the old location and project contains only reference to it.
You do not need to edit file twice - is available from all projects.
Links are shown
with little arrow
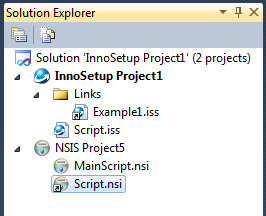
Links shown in a Solution Explorer.
(shortcut symbol) in a Solution Explorer.
Full integration into Visual Studio IDE
With Visual & Installer you can easily create installer for your software directly from your preferred IDE.
NSISProject
and InnoSetupProject(s) can live together with other solutions projects - C#, Visual Basic, C++ and many more.
Create, edit, and build your installers directly from Visual Studio without need of an external tools!
Also MSBuild properties and parameters are supported in Project properties (see below) - e.g. you can use $(MSBuildProjectFile) etc.
More info about MSBuild...
Visual Studio 2005, 2008, 2010, 2012, 2013, 2015, 2017, 2019 and 2022 support
Visual & Installer works in all recent Visual Studio versions (2005, 2008, 2010, 2012, 2013, 2015, 2017, 2019 and 2022) - and this list is still increasing!
Create your installer in your preferred IDE - without need to upgrade your current IDE to the latest one!
All editions of Visual Studio are supported, except the Express editions.
We are working on our product every day and we want to support as many Visual Studio versions as possible - let us know which IDE you use!
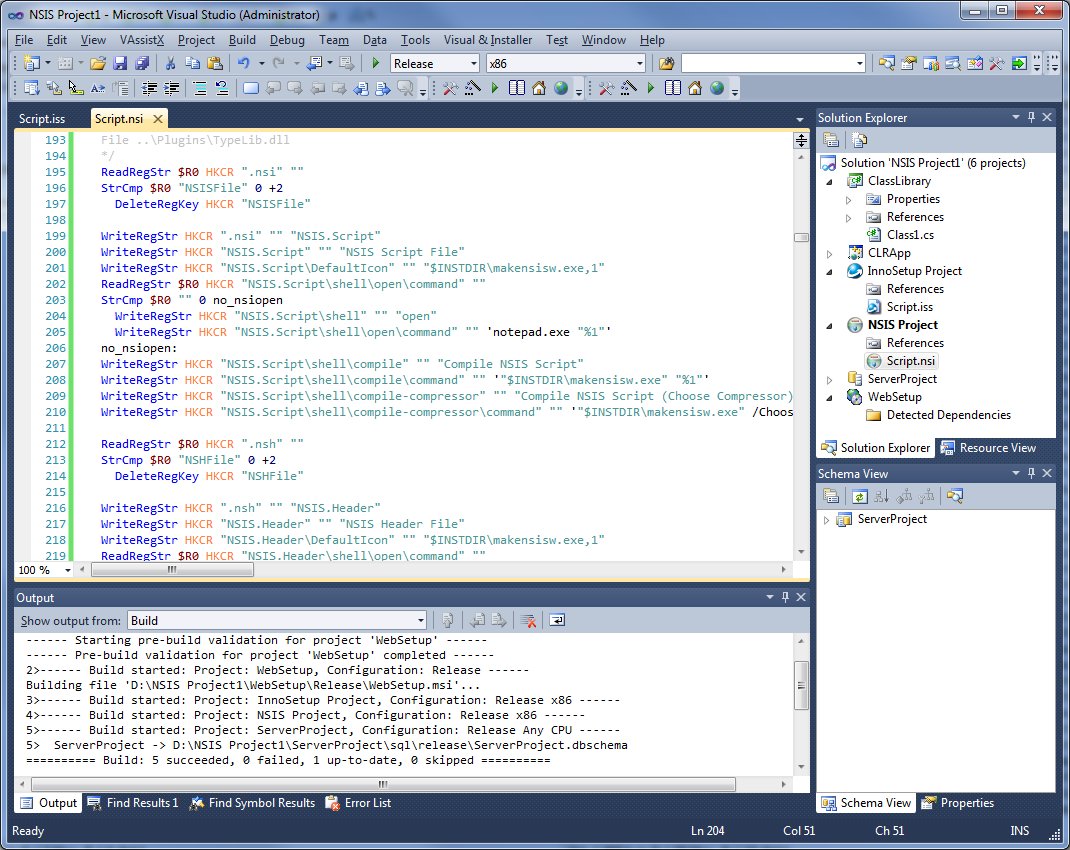
Build installers directly with other project types
A NSISProject and InnoSetupProject are deeply integrated into Visual Studio. They can be built, compiled, cleaned, deleted from solution, unloaded and reloaded back - treat them exactly as other regular project types!
Also their appearance can be customized - set Indenting, Tab size, Line numbers, Word wrap and more for
NSIS Language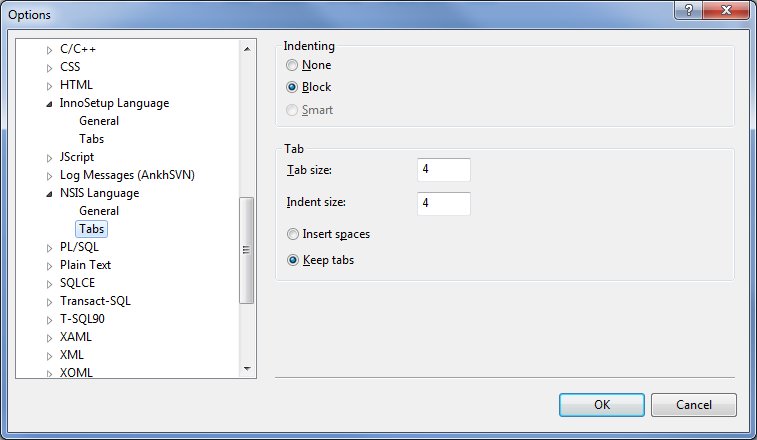
NSIS Language,
and
InnoSetup Language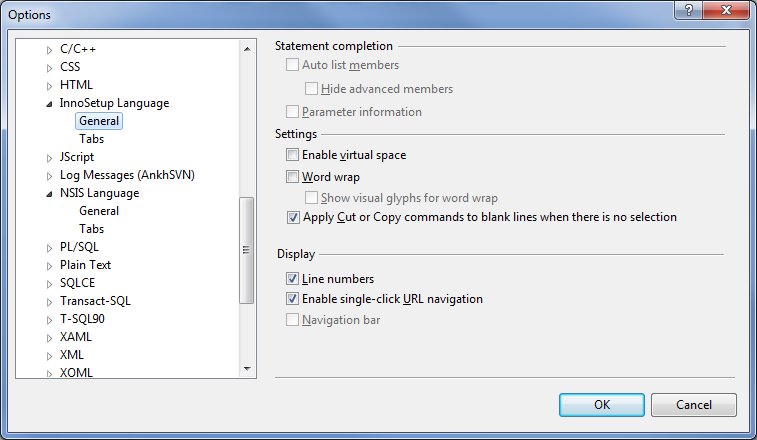
InnoSetup Language.
You can use 'Start Debugging' (F5) or 'Start Without Debugging' (Ctrl+F5) actions to run the resulting setup after build if it is named OutFile "Output/<ProjectName>.exe" ( NSIS) or OutputDir=Output OutputBaseFilename=<ProjectName> ( Inno Setup).
<ProjectName> cannot contain spaces!
Easy to be integrate into many popular build (automation) systems
Both NSIS Project (.nsisproj) and Inno Setup Project (.innoproj) are based on MSBuild so they can be easily integrated into many build (automation) systems.
Every popular build system supporting MSBuild (by default or by external plug-in) is capable of building these installer projects.
Use Jenkins, Maven, Apache Ant, Hudson, Gradle, FinalBuilder or your preferred system together with Visual & Installer and build your installer together with your software product.
See Project Properties for supported symbols and variables (platforms, configurations, ...).
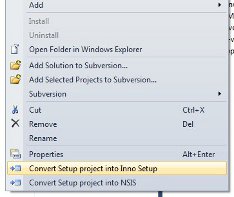
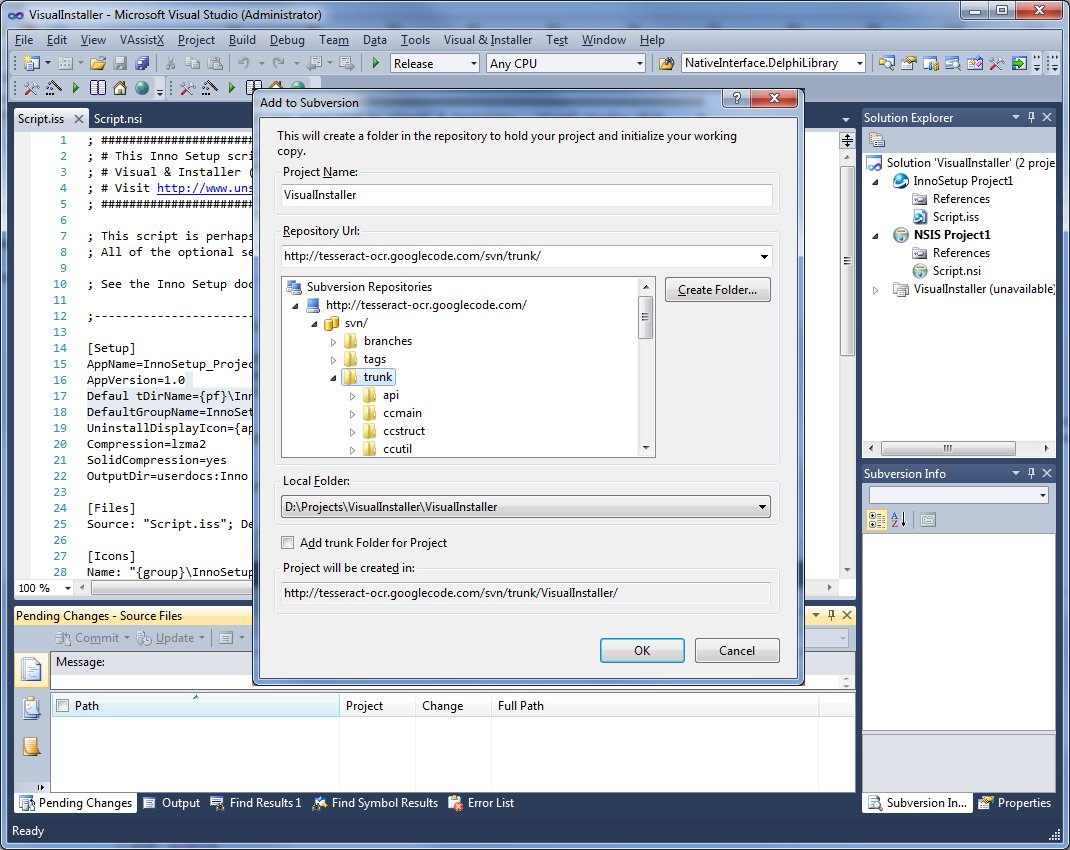
Convert Visual Studio Setup projects (.vdproj) into NSIS or Inno Setup
Visual Studio setup projects (.vdproj) will not be shipped with future versions - starting with Visual Studio 2012 which are unable to open .vdproj files.
Many developers who use it for creating .msi or .exe installer packages (also web deployment projects or cab setups) want to upgrade to VS 2012 but they have to look for a replacement.
Visual & Installer offers you the possibility to convert your existing Windows Installer  Setup Deployment projects (.vdproj) into NSIS or Inno Setup installers.
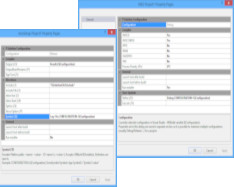
Simple right click any Setup and Deployment Project in Solution Explorer and choose the Convert Setup project into option. The
Project conversion wizard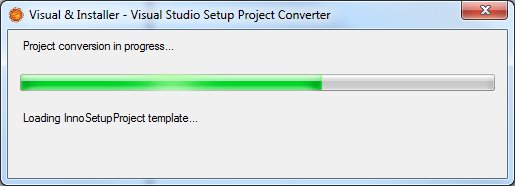
Progress of converting.vdproj file to installer will try to automatically convert most of your Setup Projects features into NSIS or Inno Setup script in a few seconds.
It is possible to convert
loaded Setup projects (.vdproj)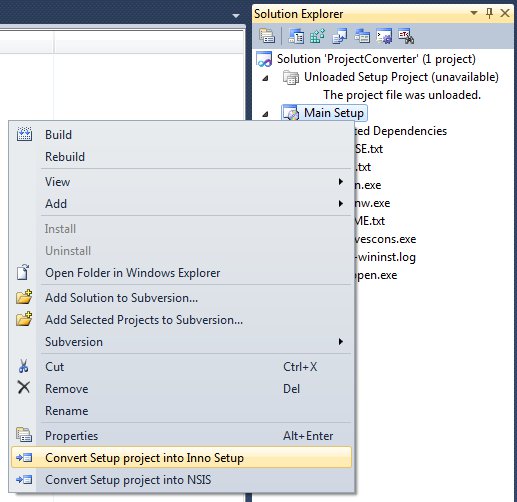
Converting loaded .vdproj file from Solution Explorer
directly without any external tools - but of course also unloaded projects! The newer versions of Visual Studio
cannot load solutions with setup projects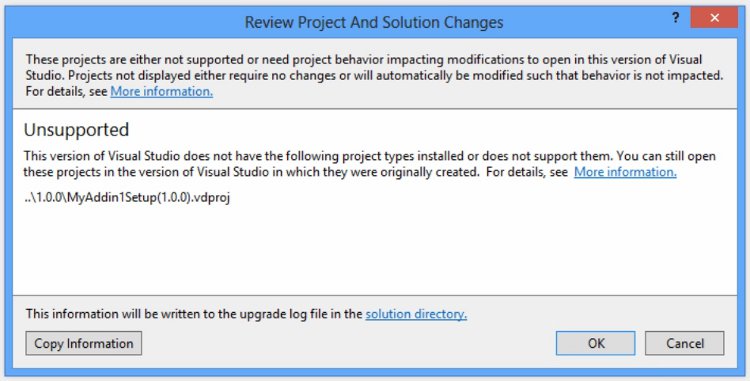
Loading .vdproj file in Visual Studio 2012
and show error ("Unsupported: this version of Visual Studio does not have the following project types installed or does not support them.") so such projects are disabled (unavailable - incompatible) in Solution Explorer.
Visual & Installer can convert all projects - starting from VS 2002. The original .vdproj file remains untouched, new NSISProject or InnoSetupProject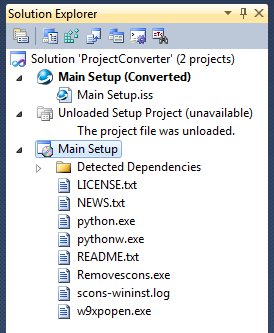
New project is created after convesion in Solution Explorer
is created in solution with appropriate script files.
Project conversion wizard can handle most of the Setup Deployment project's features (if you have really complicated script with custom actions you may need to add certain features manually):
- creating files
- creating folders
- creating registry keys
- registration of Assemblies (.dll)) into GAC ( Inno Setup only)
- registration of Type Libraries (.tlb) ( Inno Setup only)
- registration of OCXs, COMs, DLLs and other files ( Inno Setup only)
- font installation ( Inno Setup only)
- creating shortcuts
- reading project and product defails (name, GUID, installation path, manufacturer, ...)
- and more...
This feature also works in Visual Studio 2012 where .vdproj files are not officialy supported!
Note: this feature works only in:


 (up to Visual Studio 2013)
![]() Tip:
The 'Convert Setup project into...' items are not present in right click menu in Visual Studio 2015 and newer.
Tip:
The 'Convert Setup project into...' items are not present in right click menu in Visual Studio 2015 and newer.
To use this feature from Visual Studio 2015 and newer run standalone application SetupProjectsConverter.exe in the installation directory (see below).
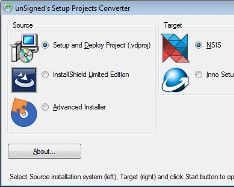
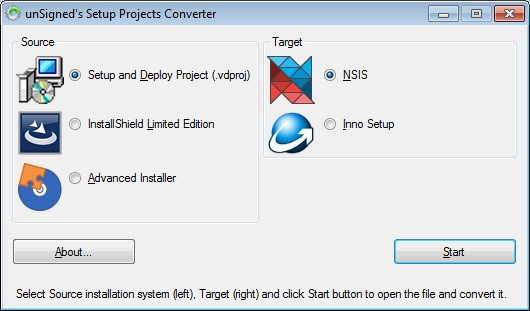
SetupProjects Converter utility
SetupProjects Converter is standalone application that can convert various installation systems into NSIS (.nsi) or Inno Setup scripts (.iss).
It is free and open-source (developed by unSigned).
Currently supported formats:
- Microsoft Visual Studio Setup and Deploy projects (.vdproj)
- InstallShield Limited Edition projects (.isl)
- Advanced Installer Projects (.aip)
You can run this application from Start menu or you can find it in Visual & Installer installation directory.
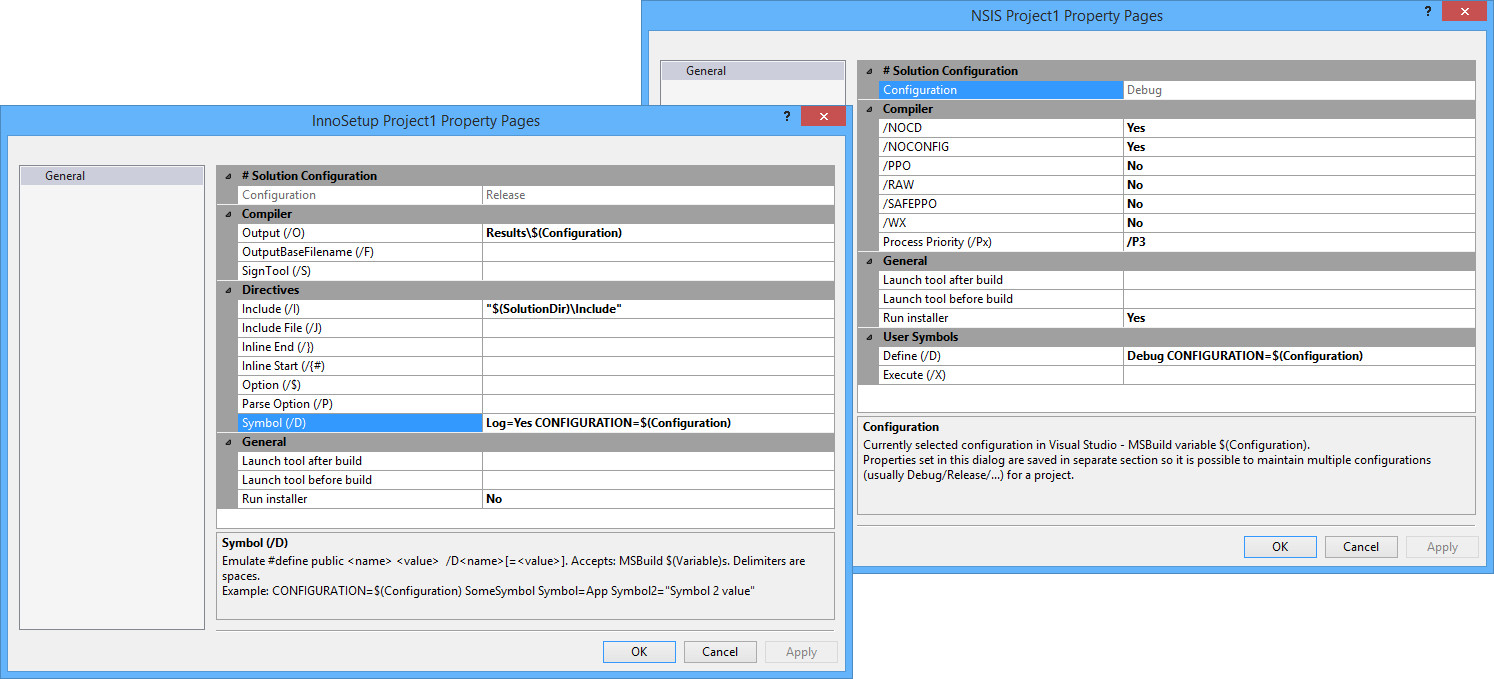
NSIS and Inno Setup Project Properties
It is possible to set command line options - Propertie for every project in Solution to modify compilation process, adjust output, define custom symbols, emulate #define and #pragma directives and more.
Using Project Properties (right click the Project in Solution Tree and click Properties) many options can be set - separately for every Project and Configuration in Solution:
MSBuild variables are supported (e.g.: $(Configuration)) - you can use them in all fields.
Properties with spaces must be enclosed with quotes! (e.g.: "string with spaces").
See FAQ section for solution to most common troubles related to Project Properties.
![]() Tip:
If the resulting Setup is stored in Output folder you can use Visual Studios actions 'Start Debugging' (F5) or 'Start Without Debugging' (Ctrl+F5) to run the Setup (without setting the Project Properties 'Run Installer' property).
Tip:
If the resulting Setup is stored in Output folder you can use Visual Studios actions 'Start Debugging' (F5) or 'Start Without Debugging' (Ctrl+F5) to run the Setup (without setting the Project Properties 'Run Installer' property).
To use these features set resulting Setup name as OutFile "Output/<ProjectName>.exe" (NSIS) or OutputDir=Output OutputBaseFilename=<ProjectName> (Inno Setup)
Building the project (F6) or Rebuilding it simply compiles the project without running the resulting Setup.
For multiple projects in Solution use 'Set as Startup Project' command (Right click the project) to set runnable project.
<ProjectName> is name of project (from Solution Explorer), it CANNOT contain spaces!
NSIS Project Properties:
| Property | Switch | Comment | Group |
|---|---|---|---|
| Configuration | - | Currently selected configuration in Visual Studio - MSBuild variable $(Configuration). Properties set in this dialog are saved in separate section so it is possible to maintain multiple configurations (usually Debug/Release/...) for a project. |
# Solution Configuration | NOCD | /NOCD | Disables the current directory change to that of the .nsi file. | Compiler |
| NOCONFIG | /NOCONFIG | Disables inclusion of <path to makensis.exe>/nsisconf.nsh. | |
| Process Priority | /Px | Compiler process priority, x is 5=real time, 4=high, 3=above normal, 2=normal, 1=below normal, 0=idle. | |
| Binary Output | /RAW | MakeNSIS output is binary (allowing Unicode texts). Supported only in Unicode NSIS (2.46.5 and newer, not in NSIS 3!). | |
| Warnings as Errors | /WX | Treats warnings as errors (Stops compilation on warning). | |
| Preprocessor | /PPO | Runs only the preprocessor (Prints the result to Output Window). | |
| Safe Preprocessor | /SAFEPPO | Runs only the preprocessor (Prints the result to Output Window). The safe version will not execute instructions like !appendfile or !system. !packhdr and !finalize are never executed. |
|
| Defined symbol | /D | define[=value] defines the symbol 'define' for the script [to value]. Accepts: MSBuild $(Variable)s. Delimiters are spaces. Parameters are processed by order! (/Ddef ins.nsi != ins.nsi /Ddef). Example: CONFIGURATION=$(Configuration) SomeSymbol Symbol=App Symbol2="Symbol 2 value" |
User Symbols |
| Execute symbol | /X | Executes scriptcmd in script (i.e. '/XOutFile inst.exe'). | |
| Launch tool after build | - | Launch specified application after successful build. Accepts: MSBuild $(Variable)s and ${Symbol}s (defined above). Output of this application is redirected into Output window (useful for batch files or command line utilities). |
General |
| Launch tool before build | - | Launch specified application before build. Accepts: MSBuild $(Variable)s and ${Symbol}s (defined above). Output of this application is redirected into Output window (useful for batch files or command line utilities). |
|
| Run installer | - | Run generated installer after successful compilation. | |
| Run installer - Parameters | - | Parameters passed to launched installer. Accepts: MSBuild $(Variable)s and ${Symbol}s. |
Inno Setup Project Properties:
| Property | Switch | Comment | Group |
|---|---|---|---|
| Configuration | - | Currently selected configuration in Visual Studio - MSBuild variable $(Configuration). Properties set in this dialog are saved in separate section so it is possible to maintain multiple configurations (usually Debug/Release/...) for a project. |
# Solution Configuration |
| Output | /O | Output files to specified path (overrides OutputDir): /O<path>. Accepts: MSBuild $(Variable)s. Example: "$(SolutionDir)\Setups\$(Configuration)\" |
Compiler |
| OutputBaseFilename | /F | Overrides OutputBaseFilename with the specified filename: /F<filename>. | |
| SignTool | /S | Sets a SignTool with the specified name and command: /S<name>=<command>. | |
| Defined symbol | /D | Emulate #define public <name> <value> /D<name>[=<value>]. Accepts: MSBuild $(Variable)s. Delimiters are spaces.\nExample: CONFIGURATION=$(Configuration) SomeSymbol Symbol=App Symbol2=\"Symbol 2 value\" | Directives |
| Include | /I | Emulate #pragma include <paths> /I<paths>. Accepts: MSBuild $(Variable)s. Example: "$(MSBuildProjectDirectory)\Include\" |
Include File | /J | Emulate #include <filename> /J<filename> |
| Option | /$ | Emulate #pragma option -<letter>(+|-) /$<letter>(+|-) | |
| Parse Option | /P | Emulate #pragma parseroption -<letter>(+|-) /P<letter>(+|-) | |
| Inline Start | /{# | Emulate #pragma inlinestart <string> /{#<string> | |
| Inline End | /} | Emulate #pragma inlineend <string> /}<string> | |
| Launch tool after build | - | Launch specified application after successful build. Accepts: MSBuild $(Variable)s and {#Symbol}s (defined above). Output of this application is redirected into Output window (useful for batch files or command line utilities). |
General |
| Launch tool before build | - | Launch specified application before build. Accepts: MSBuild $(Variable)s and {#Symbol}s (defined above). Output of this application is redirected into Output window (useful for batch files or command line utilities). |
|
| Run installer | - | Run generated installer after successful compilation. | |
| Run installer - Parameters | - | Parameters passed to launched installer. Accepts: MSBuild $(Variable)s and {#Symbol}s. |
Syntax highlighting (coloring)
Syntax highlighting was important feature of Visual Studio for ages. Now your NSIS (*.nsi and *.nsh) and Inno Setup (*.iss) files can be colored too!
Improve readability of your scripts in Visual Studio! All colors can be customized - there are many elements supported: Keywords, Comments, Parameters, Variables, Constants, labels, Preprocessor and many more...
Configure them easily in Tools -> Options -> Environment -> Fonts and Colors dialog for
NSIS Language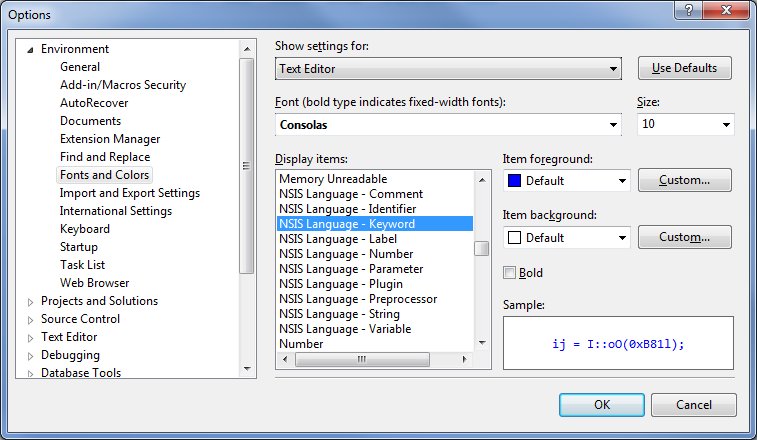
NSIS Language,
and
InnoSetup Language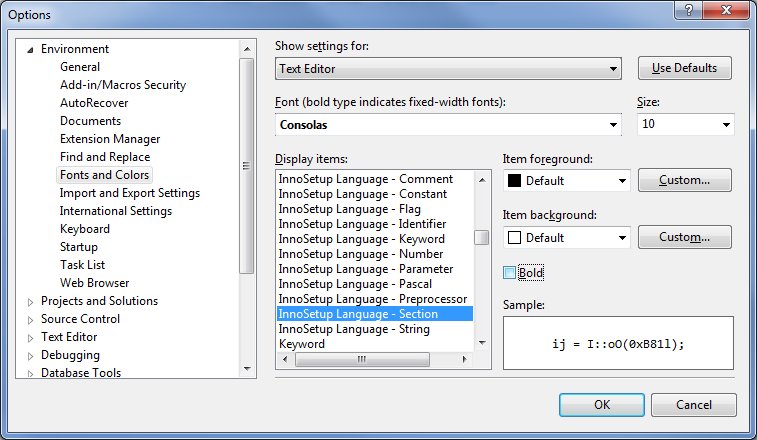
InnoSetup Language.
However NSIS and Inno Setup scripts are case INsensitive you need to write words correctly to have syntax highlighting working!
Word under cursor highlighting
This feature allows you to quickly find all occurences of specified text (that may be variable, function, macro or any word) in your script.
Click any text in Text Editor window and all occurrences of this word will be highlighted. Click empty space to disable highlighting.
This feature can be adjusted in Settings dialog (Category Text Editor).
Note: this feature works only in:  (Visual Studio 2010 and newer)
Braces matching
If you move text cursor behind any curly/square/round brace (opening or closing: ( ) [ ] { }) the matching brace (if exists) is highlighted.
With this feature you can quickly find start and end of your function or procedure parameters list, expression or logical condition. The feature is intended for [Code] section but works also in other sections (in specific cases).
Braces within string literals ("This is a string literal." or 'This string literal') and proprocessor texts are not highlighted. Also the curly braces in {#InnoSetupSymbol} are NOT highlighted.
This feature can be adjusted in Settings dialog (Category Text Editor).
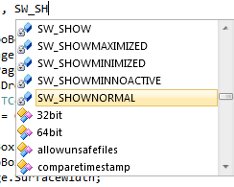
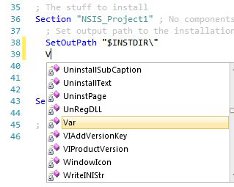
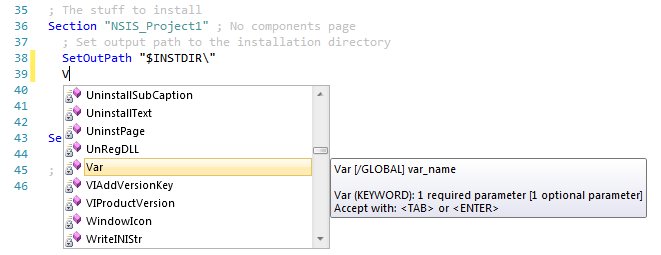
IntelliSense Complete Word support
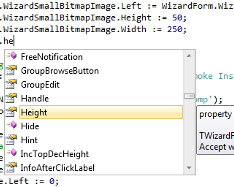
Do not waste your time by manual writing whole comands, functions, parameters, directives etc.! Using IntelliSense Complete Word support you can speed up writing your installers.
Simply hit Ctrl+Space and immediately you will see a list of possible word matches. (Yes, exactly as in C++/C# or any other language in Visual Studio!)
A short information is shown in tooltip so you can quickly recognize them.
List of all supported IntelliSense types:
| Icon | NSIS Type | Inno Type | NSIS color | Inno color | Example NSIS | Example Inno |
|---|---|---|---|---|---|---|

|
Variable | Variable | 
|

|
Var myVar | myVar: Integer |

|
Global variable | Global variable |
|

|
Var /GLOBAL myG | GlobalVar: String |

|
Variable | Static variable |
|
|
$0 - $R9 | WizardForm |

|
Constant | Constant |
|
|
$INSTDIR | {app} |

|
Function | Function/Procedure |
|
|
MyFunction | MyFunction() |

|
Callback | Event Function / Procedure |
|
|
.onGUIInit | NextButtonClick() |

|
Command | Pascal code |
|
|
ShowWindow | IntToStr() |

|
Parameter | Parameter | 
|
|
/SILENT | Common |

|
Plug-in export | - | 
|
- | Inetc::get | - |

|
Directive | Symbol | 
|
|
!include | {#APP_NAME} |

|
- | Directive | - |
|
- | AppName |

|
- | Flag | - |
|
- | promptifolder |

|
Header file | - |
|
- | "FileFunc.nsh" | - |

|
Code Snippet | Code Snippet | - | - | _if | _beg |

|
- | Class | - |
|
- | TPanel |
All colors can be changed easily in Tools -> Options -> Environment -> Fonts and Colors dialog.
Note for Inno Setup: IntelliSense is section sensitive - in [Code] section it offers you items related to Pascal scripting (variables, parameters, procedures, functions, ...) and outside of [Code] it offers Inno specific items (parameters, directives, flags, constants, ...). Specific items can be used in all sections.
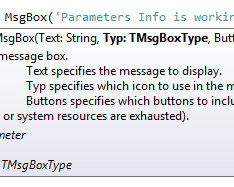
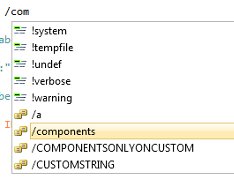
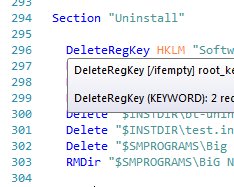
IntelliSense Parameter Info
Writing installation scripts (especially large) often requires calling Pascal functions or procedures (or commands in NSIS). With this feature you get extra help: as you type function name and type the left parenthesis '(' a tooltip is shown at cursor position.
This tooltip contains detailed description - which tells you the usage of the function or procedure, number and types of parameters and many more useful information.
The tooltip is updated as you write. After comma ',' the tooltip is updated and current parameter is highlighted in bold.
This feature can be adjusted in Settings dialog (Category Text Editor).
![]() NSIS Tip:
NSIS Tip:
NSIS has special syntax: parameters are separated with spaces which are not accepted and recognized in Visual Studio correctly.
Thus we added special helper characters to have NSIS Parameter Info feature working correctly:
Parameter Info is triggered by entering the left square bracket '[' character.
To move to next parameter use comma ',' and to skip optional parameter use at '@' (folowed by comma if there is another parameter).
Don't worry about the helper characters: they disappear (or are replaced by spaces) immediately after you type right square bracket ']'.

IntelliSense Quick Info
If you are not sure what certain symbol, parameter or just any word in script means then solve your dilema easily using Quick Info feature!
Move the mouse over some word - and a small tooltip with help will appear with basic information, type, parameters, correct usage.
Quick Info works for most of the code - NSIS commands, proprocessor directives, parameters, variables, constants, flags and also for Inno Setup Pascal functions and procedures, directives, parameters, flags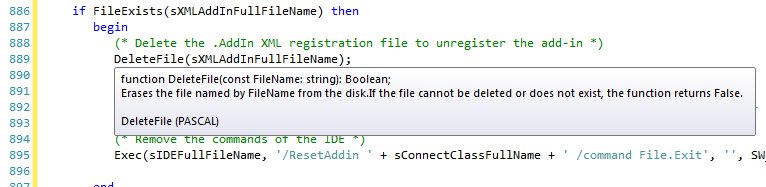
InnoSetup Pascal functions and procedures Quick Info, ...
IntelliSense Member Completion
The IntelliSense Member Completion is a tool tip that displays a list of possible members for classes (objects), local variables or global (static) variables. If you type variable followed by a period (.) all possible members of this class are presented in a list from which you can choose.
This feature works only for objects because in Inno Setup there are no members available for not object variables (Integer, String, ...).
You can move cursor over any class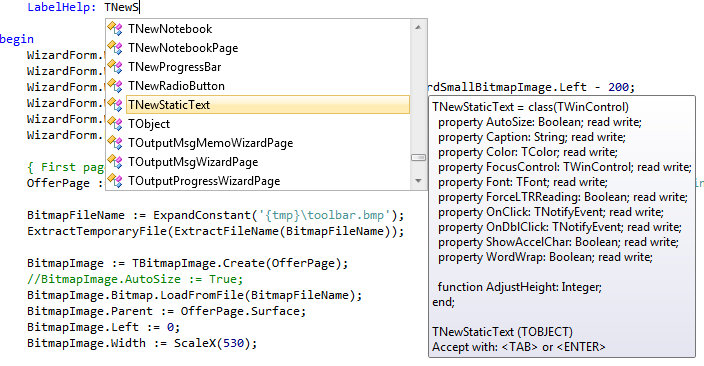
IntelliSense for classes (objects) in Pascal language to view it's members.
* InnoSetupProject only

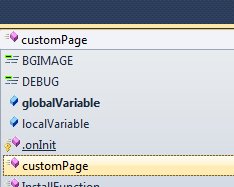
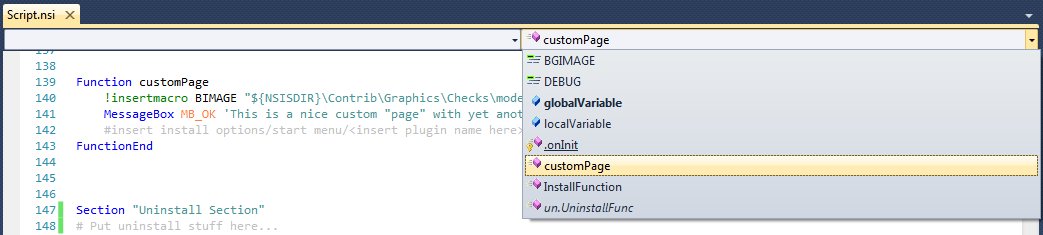
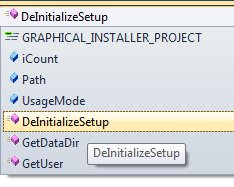
Navigation Bars support
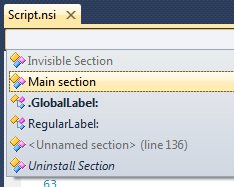
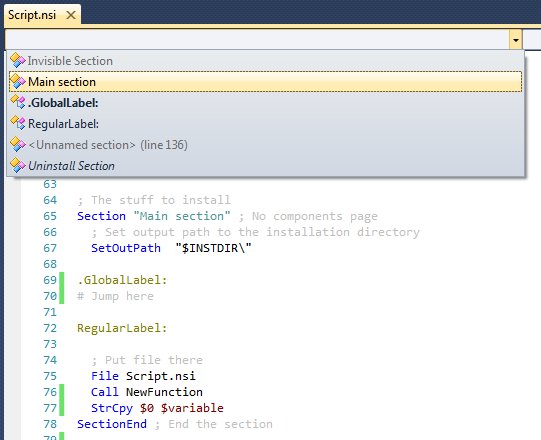
Navigation Bars allow you to quickly access the most important parts of the script. They are divided into two parts:
- Left one (called Types) is designed for fast switching between important parts of the script and
- Right one (called members) contains user defined content - use it to jump to symbol definition (variable, function, symbol).
Every item in both drop-down boxes contains icon and text. Text (font) style can vary - everything is shown immediately as user types the script into editor.
You can also use GoTo feature on all items in these boxes.
Navigation bars are grouped by type of item and sorted alphabetically - allowing you quickly find desired item.
Navigation Bars in
NSISProject:

Left drop-down box (called Types) is used for fast switching between Sections, SectionGroups and Labels.
| Icon | Type | Font style | Example |
|---|---|---|---|
|
|
Regular section | - | Section "Main section" |
|
|
Invisible section | Grayed | Section "-Invisible Section" |
|
|
Bold section | Bold | Section "!Bold section" |
|
|
Section without name | <Unnamed section> | Section "" |
|
|
Uninstall section | Italic | Section "Uninstall" |
|
|
Regular label | - | Label: |
|
|
Global label | Bold | .GlobalLabel: |

|
SectionGroup | - | SectionGroup "Main group" |
Right drop-down box (called Members) contains user defined Variables, Functions, Symbols and Macros.
| Icon | Type | Font style | Example |
|---|---|---|---|
|
|
Local variable | - | Var variable |
|
|
Global variable | Bold | Var /GLOBAL globalVar |
|
|
Function | - | Function MyFunction |
|
|
Callback | Underline | Function .onInit |
|
|
Uninstall function | Italic | Function "un.Function" |

|
Page Creator/Leave | - | Page Custom ShowPage |
|
|
UninstPage Creator/Leave | Italic | UninstPage Custom ShowUnPage |
|
|
Defined symbol | - | !define DEBUG |
|
|
Macro | Italic | !macro MY_MACRO |
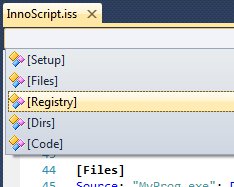
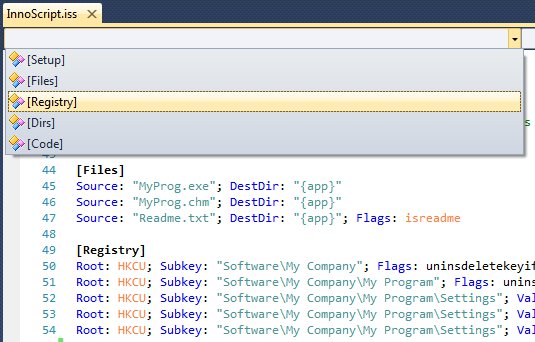
Navigation Bars in
InnoSetupProject:

Left drop-down box (called Types) is used for fast switching between Sections, Types and Constants.
| Icon | Type | Font style | Example |
|---|---|---|---|
|
|
Section | - | [Setup] |
|
|
Type | - | type TDays = (Monday, Tuesday); |
|
|
Const | - | No = False; |
Right drop-down box (called Members) contains user defined Variables, Functions/Procedures, Parameters and Symbols.
| Icon | Type | Font style | Example |
|---|---|---|---|
|
|
Global variable | Bold | GlobalVar: String |
|
|
Static variable | Bold | MainForm, WizardForm, UninstallProgressForm |
|
|
Variable | - | I: Integer; |
|
|
Parameter | Italic | PageID: Integer; |
|
|
Function | - | function GetData(): Integer; |
|
|
Procedure | Italic | procedure CountItems(); |
|
|
Event Function | Underline | function InitializeSetup(): Boolean; |
|
|
Event Procedure | Underline Italic | procedure InitializeWizard; |
|
|
External Function | - | function F; external '<dllfunctionname>@<dllfilename>'; |
|
|
External Procedure | Italic | procedure P; external '<dllprocname>@<dllfilename>'; |
|
|
Symbol | - | #define DEBUG |
|
|
Public Symbol | Bold | #define public NAME |
Note: There are 3 global static variables in
Inno Setup: MainForm (TMainForm), WizardForm (TWizardForm) and UninstallProgressForm (TUninstallProgressForm).
These variables are always visible and accessible (as they are defined directly in Inno's sources): we attached them to line [Code].

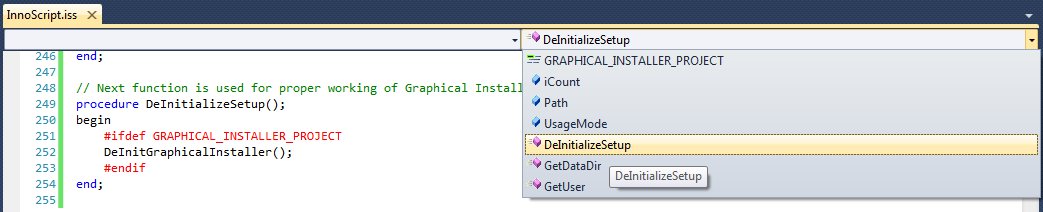
Outlining (Regions) support
Outlining regions (aka Code folding) is a feature that allows you to selectively hide and display sections of a script file. This allows you to manage large amounts of text while viewing only those subsections of the text that are specifically relevant at any given time.
Regions are marked by a tag which provides the standard outlining behavior. The region can be expanded or collapsed. The outlined region is marked by a plus sign [+] if it is collapsed or a minus sign [-] if it is expanded, and the expanded region is demarcated by a vertical line.
Outlining regions can be used anywhere in the script file (*.nsi, *.nsh, *.nsl, *.iss).
For NSISProject use #region and #endregion to mark the region.
For InnoSetupProject use //region and //endregion to mark the region.
Outlining regions have no effect on compilation speed, script size or resulting installer's size.
Note: this feature works only in: (Visual Studio 2010 and newer)
![]() Tip:
Tip:
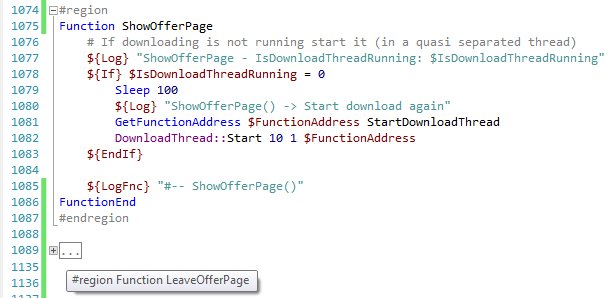
Be careful when creating regions.
A region block cannot overlap with a automatic region block.
However, a region block can be nested in a automatic region block, and a automatic region block can be nested in a region block.
Automatic Outlining (Regions) support
Automatic Outlining (Regions) is similar to classic regions but everything is automated - you do not need to write #region .. #endregion (or //region .. //endregion) manually but the script file is scanned in background and regions are created automatically.
In NSISProject these regions are created for functions, sections, section groups and macros:
- Function .. FunctionEnd
- Section .. SectionEnd
- SectionGroup .. SectionGroupEnd
- !macro .. !macroend
In
InnoSetupProject regions are created for each section and for each procedure and function in [Code] section:
- [Setup], [Files], [Code], [Types], [Languages], [Messages], [CustomMessages], [Components], [Tasks], [Dirs], [Icons], [INI], [InstallDelete], [LangOptions], [Registry], [Run], [UninstallDelete], [UninstallRun]
- procedure
- function
This feature can be adjusted in Settings dialog (Category Text Editor).
Note: this feature works only in:
(Visual Studio 2010 and newer)
![]() Tip:
Tip:
Although script files are not case sensitive automatic regions (and whole NSIS/Inno Setup integration in Visual Studio)
is case sensitive! If regions are not created then probably you have mistake in your syntax.
Automatic regions (=keywords) should be placed on the beginning of the line followed with a space.
Parsing large script files may take a while - to achieve best performance you can turn this feature off.
Complete linkage to the solution build process
With NSIS Project and Inno Setup Project you can do everything you used to do with your projects.
They support
Configuration Manager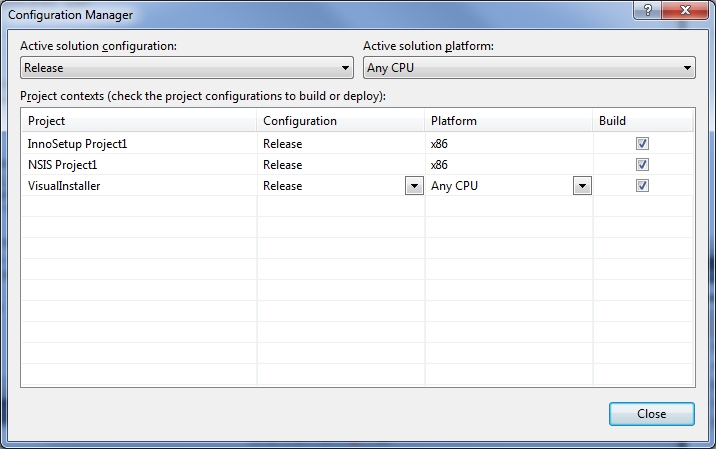
Configuration Manager,
Batch Build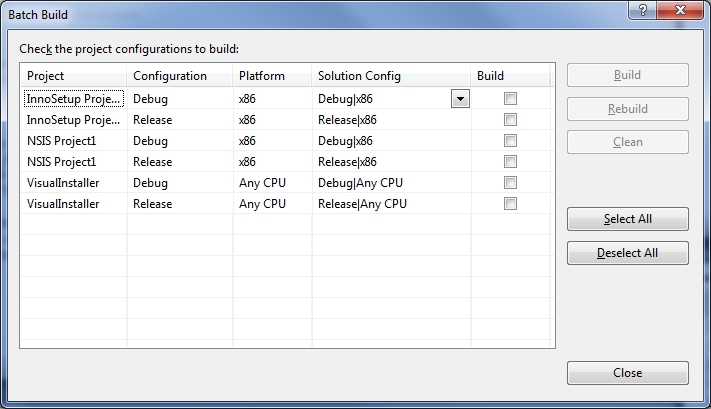
Batch Build, you can set
Project Dependencies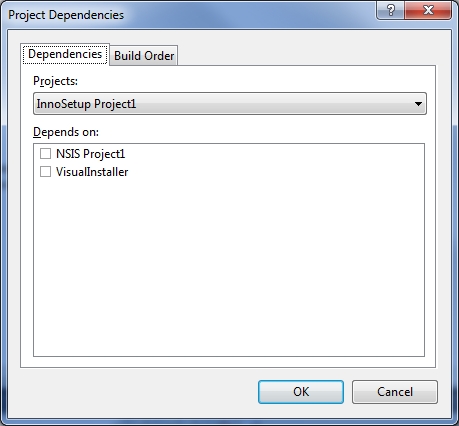
Project Dependencies,
Project Build Order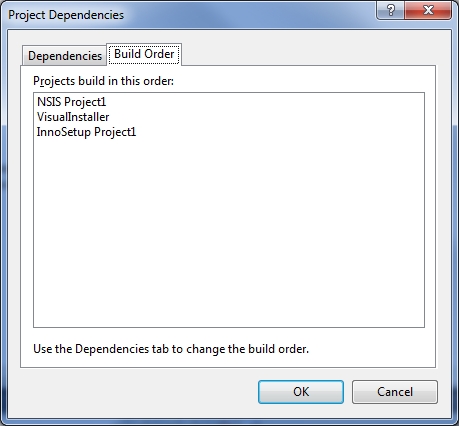
Project Build Order and and many more properties.
Working with projects is easy and also it is possible to adjust properties for each project item (file)!
Launch a Visual Studio, load your solution directly from
Start page
Start page and work can begin!
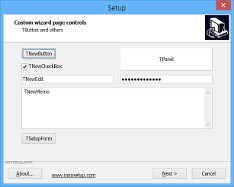
Inno Setup Form Designer / NSIS Form Designer
Visual & Installer is perfect tool for quick & easy creating Inno Setup or NSIS forms (custom installer pages).
Because both installation systems NSIS and Inno Setup are script based, the installers forms are created manually by writing the code in editor.
And that is really simple with provided features like IntelliSense Complete Word (Ctrl + Space)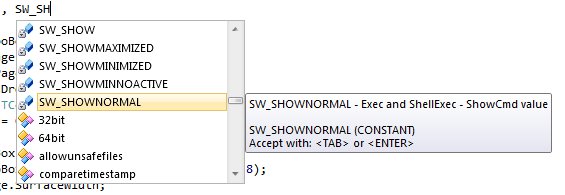
Complete Word (Ctrl + Space),
Quick Info 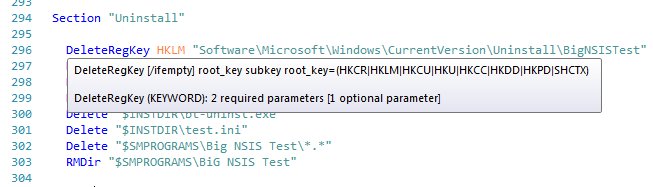
Quick Info ,
Parameter Info
Parameter Info,
Member Completion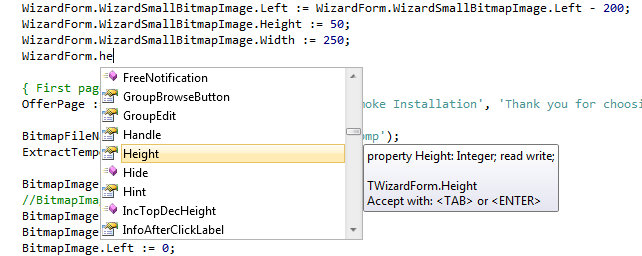
Member Completion and many other!
Also you can use help of
Code Snippets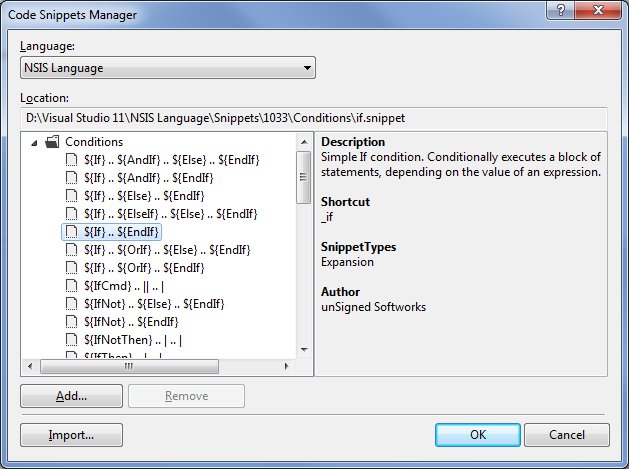
Code Snippets
to insert most often used pieces of code and whole form is created within few minutes.
See the Inno Setup or
NSIS documentation for more details about creating custom forms.
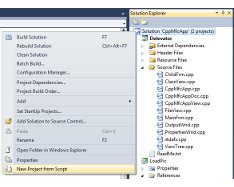
New project from Script
You can easily create new NSISProject and InnoSetupProject from your existing script file(s).
Right click the Solution node in the Solution Explorer, select New Project from Script and select your existing script file (*.nsi for NSIS or *.iss for Inno Setup).
Script file is loaded and parsed and new project is created in the Solution. Project is saved in the same dierctory as script file so the script file can be immediately compiled.
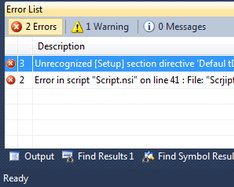
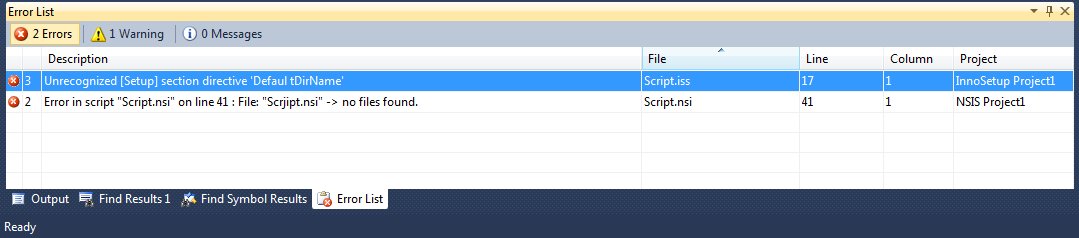
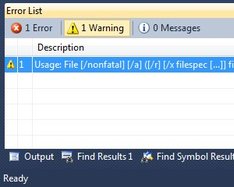
Quick jump from Error List window
Did you used to double-click the error message in Error List to quickly jump to wrong line if some error occurred in your code? This is working for NSIS and InnoSetup Projects too! Detailed error description and location is shown in this list everytime something wrong happens during compilation of the script. Do not lose your time navigating among lines and files. Double click the error and correct file is immediately opened and error line highlighted!
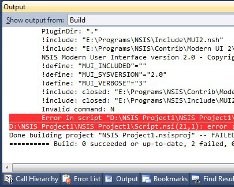
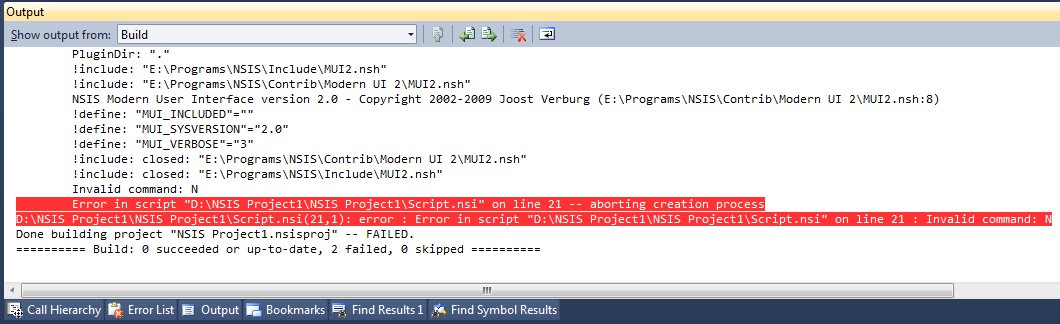
Colorized Output Window
Sometimes you need to check the output of compiler (in the Output Window) for results. If compiler's output is very verbosed it may be difficult to find errors or warnings.
This feature colorize lines with errors and warnings in the Output Window (for NSIS and Inno Setup) so they can be recognized easily.
This feature can be adjusted in Settings dialog (Category General).
Note: this feature works only in: (Visual Studio 2010 and newer)
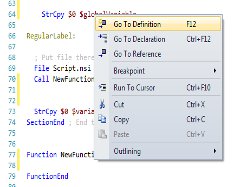
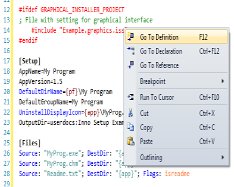
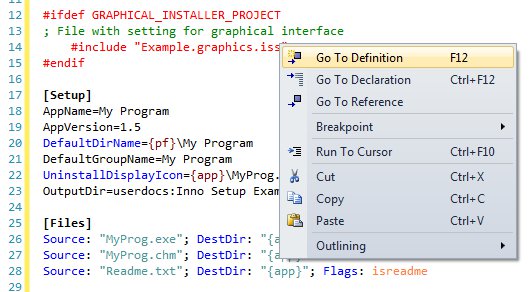
Go To support
If you used to use Go To... commands in Visual Studio IDE you can use them also for your NSIS and Inno Setup scripts!
Simply move cursor on word (variable, function, macro, symbol, ...) and pres any Go To shortcut. All commands are also available through the right-click.
Currently all three commands: Go To Definition (default shortcut is F12), Go To Declaration (Ctrl+F12) and Go To Reference will move the cursor to the line where underlying symbol is defined.
![]() Tip:
Tip:
 Anytime you see a ToolTip (when you move mouse over some word in editor) you can use Go To feature.
Also you can use Go To feature for all items shown in Navigation Bars.
Inno Setup users can also use Go To feature on "{cm:...}, {code:...}, {ini:...}, {reg:...}" constants.
Go To also works on included files - use F12 to open file at cursor.
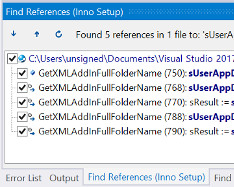

Find References
Useful feature for large scripts. You can quickly display all occurences of desired item in whole script file.
Click any word in editor and select Find References from context menu (right click tin the Text Editor area) or press keyboard shortcut (default is Alt+Shift+F,
you may change it manually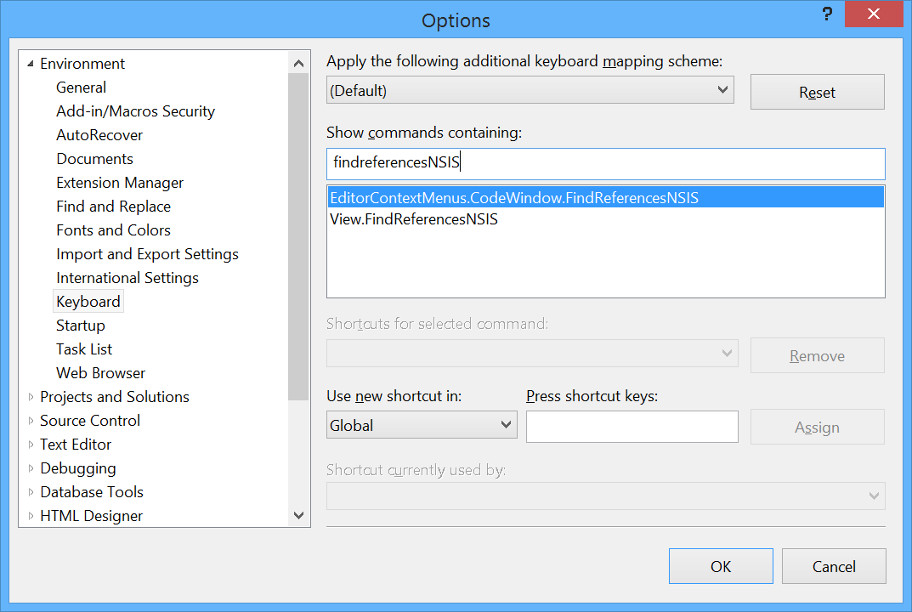
Custom shortcut for Find References).
Find References window shows up and all found matches are displayed (in bold) with additional details.
By double-clicking the item in the results list you can quickly jump to the found occurence.
In
NSIS almost all items from Navigation Bar (right drop-down box called Members) are supported:
| Icon | Type | Font style | Example |
|---|---|---|---|
|
|
Local variable | - | Var variable |
|
|
Global variable | Bold | Var /GLOBAL globalVar |
|
|
Function | - | Function MyFunction |
|
|
Callback | Underline | Function .onInit |
|
|
Uninstall function | Italic | Function "un.Function" |
|
|
Page Creator/Leave | - | Page Custom ShowPage |
|
|
UninstPage Creator/Leave | Italic | UninstPage Custom ShowUnPage |
|
|
Defined symbol | - | !define DEBUG |
|
|
Macro | Italic | !macro MY_MACRO |
In
Inno Setup these items from Navigation Bar (Right drop-down box called Members) are supported:
| Icon | Type | Font style | Example |
|---|---|---|---|
|
|
Global variable | Bold | GlobalVar: String |
|
|
Variable | - | I: Integer; |
|
|
Function | - | function GetData(): Integer; |
|
|
Procedure | Italic | procedure CountItems(); |
|
|
External Function | - | function F; external '<dllfunctionname>@<dllfilename>'; |
|
|
External Procedure | Italic | procedure P; external '<dllprocname>@<dllfilename>'; |
|
|
Symbol | - | #define DEBUG |
|
|
Public Symbol | Bold | #define public NAME |
![]()
 Tip:
Tip:
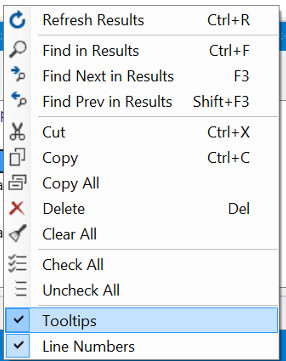
Right click the References control to show its Popup menu.
From this menu you can perform many additional useful actions like Find text, Copy, Cut, Delete, Clear, Check, etc. which works with references found in script file.
You can also use shortcuts for these actions.
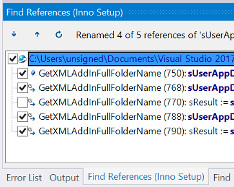

Rename References
References found using Find References features can be easily renamed with this feature.
Enter the new name, check/uncheck item you want to rename and click the Rename button (or press Enter).
By double-clicking the item in the results list you can quickly jump to the renamed occurence.
Note: By default Symbols (${} or {#}) are not recognized (also not found by Find References feature) in string literals!
![]() Tip:
Tip:
You do not need to write $, ${} ( NSIS) or {#} ( Inno Setup). They are added automatically (if necessarry).
You can press Enter (instead of clicking the Rename button) to rename references quickly and save some time!
Click the Copy button to copy content of References Window into Clipboard (as text).
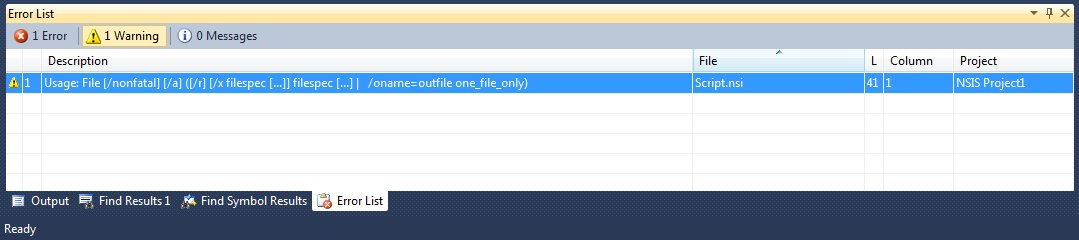
Hints and Tips for writing scripts
Do not waste your time searching manuals and guides. If you make an error in your NSIS script, Visual & Installer compiler can help you!
Check the Warnings list - for every NSIS command and preprocessor directive correct syntax is shown - to help you write your installer faster!
This also works for Inno Setup
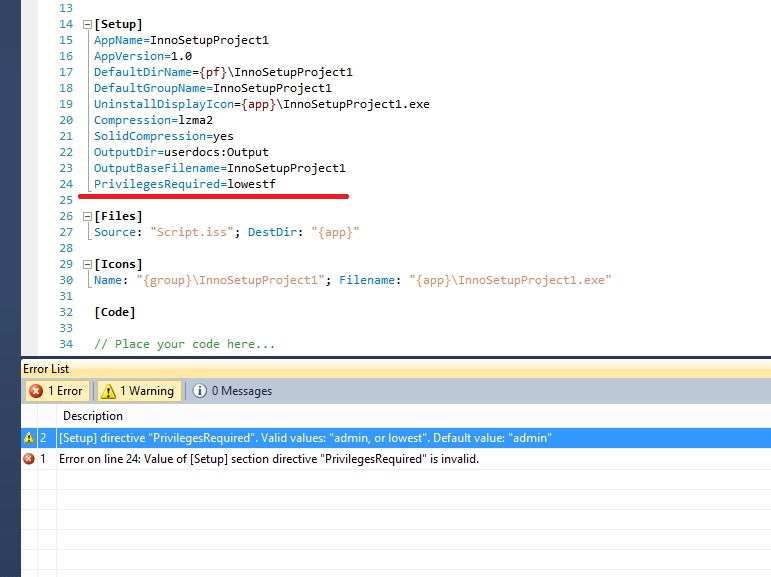
Hints and Tips for Inno Setup
- detailed information about [Setup] section directive parameters is shown when invalid value is used.

Code optimizations
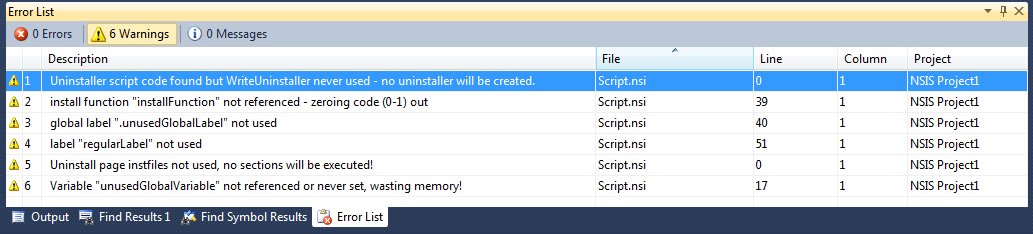
Visual & Installer compiler keeps an eye on your code.
If you forget to remove some unreferenced item you will get a warning.
Unused or unreferenced NSIS Install/Uninstall Functions, Variables, global/regular Labels and other items are recognized. Clean up your script and save memory!
In Inno Setup Code Optimizations
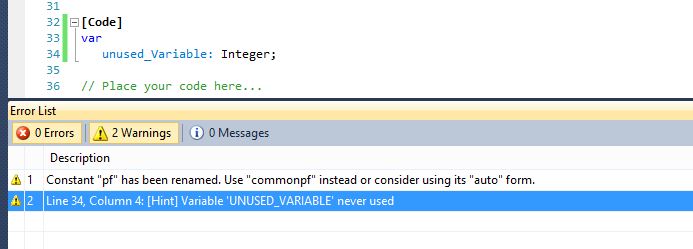 Inno Setup Code Optimizations
feature tracks unused Variables and shows hint when variable has zero references.
Inno Setup Code Optimizations
feature tracks unused Variables and shows hint when variable has zero references.
Opening script files (Go To file)
This feature is very similar to Go To feature but works only for recognized script files (*.nsi/*.nsh and *.iss).
On line which contains directive !include "some_file.nsh/.nsi" (for NSIS Project)
or #include "some_file.iss" (for Inno Setup Project) you can press Go To Definition (default shortcut is F12) and the file at cursor position will be opened in Visual Studio editor.
File is immediately parsed and it's syntax colorized, user defined symbols, variables, functions, ... are loaded and file is ready to use.
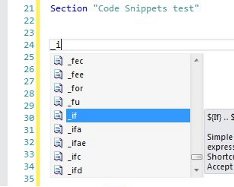
IntelliSense Code Snippets support
Visual & Installer includes a code library consisting of several tens pieces of code, called IntelliSense Code snippets, that are ready to be inserted in your script (for both NSISProject and InnoSetupProject).
Each snippet performs some task such as declaring variable, creating function or section, writing condition or loop. You can insert a snippet into your source code with a few mouse clicks.
Snippets starts with _ and consists up to 4 characters for quick inserting.
Use them and write your code faster and easier!
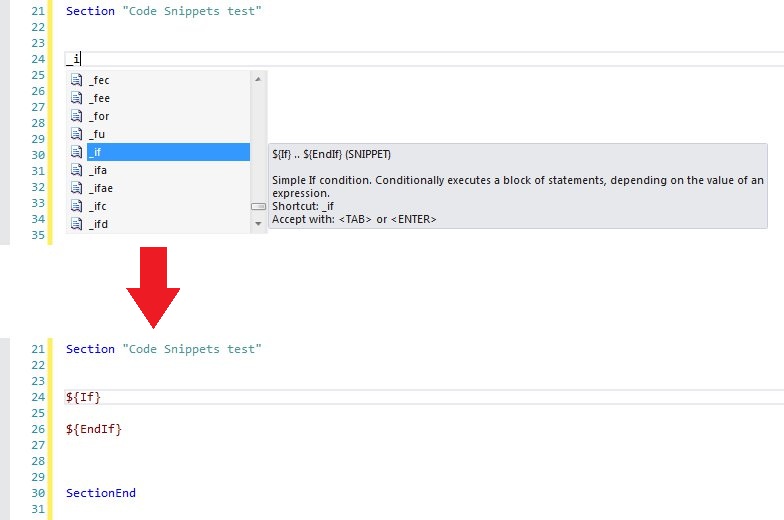
Creating custom Code Snippets
You can create your own snippets that suit your business needs, add them to the library, and then use them when needed.
Snippets are simple .xml files with .snippet extension and they follow the same rules as other (C#/Visual Basic/JavaScript/...) Visual Studio snippets.
Read Creating Code Snippets article on MSDN to learn more about snippets basics.
Visual & Installer snippets are stored separately for every version of Visual Studio - so you can create different snippets for various VS versions.
Snippets are stored globally for ALL users, per-user snippets (located in C:\Users\%user_name%\Documents\Visual Studio %edition%\Code Snippets) are not supported!
Follow these few simple rules for creating custom snippets:
- All snippets should start with '_' to avoid collision with IntelliSense Complete Word functionality
- Snippets must be stored in these directories:
- %InstallRoot%\NSIS Language\Snippets\%LCID%\User Defined\ - for NSISProject
- %InstallRoot%\InnoSetup Language\Snippets\%LCID%\User Defined\ - for InnoSetupProject
- %InstallRoot%\NSIS Language\Snippets\%LCID%\User Defined\ - for
- %InstallRoot% is root installation folder for Visual Studio (for example C:\Program Files\Microsoft Visual Studio 8)
- %LCID% is Locale ID (this is 1033 for English)
- Snippets must be valid .xml files with .snippet extension following the Code Snippets XMLSchema Reference.
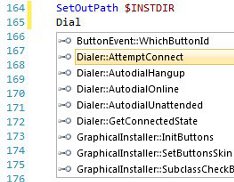
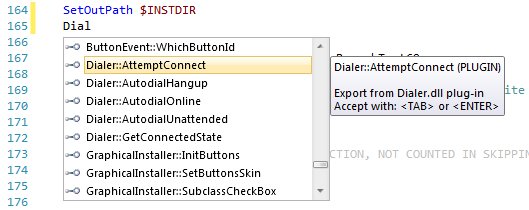
Plug-ins recognition
Visual & Installer scans NSIS Plugins directory instead of you and shows you all possible commands.
Do not look for manuals, documentation - simply hit Ctrl+Space and all possible exports are immediately shown.
Write your installers quickly and without useless errors!
* NSIS Project only
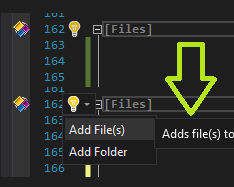
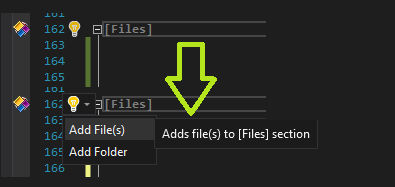
Quick Actions (Light Bulb Suggestions)
Light Bulbs are icons in the Visual Studio editor that expand to display a set of actions. Visual & Installer offers 2 new quick actions:
Adding File(s) / Folder into Inno Setup [Files] section and into NSIS Sections
Usage:
Place the caret on word [Files] (for place caret on word Section), the Light Bulb icon appears.
Click it and choose the Add File(s) or Add Folder action and the Add dialog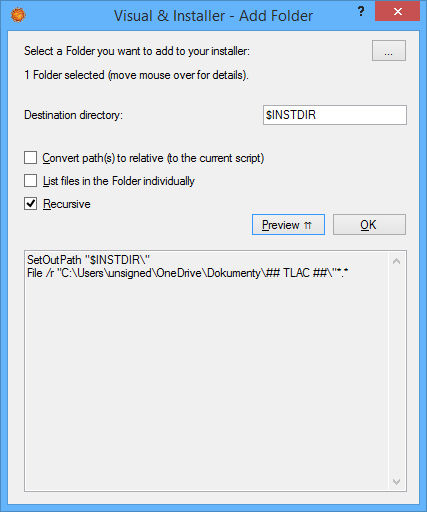
Add dialog for NSIS is shown.
Browse for File(s) / Folder you want to add and click the OK button to generate and paste the script into your file. This dialog is also customizable how the resulting script is generated.
Bu default this feature is turned OFF (to save the performance on slower machines), turn it ON in Settings dialog.
Note: this feature works only in recent Visual Studios (2015 and newer): 

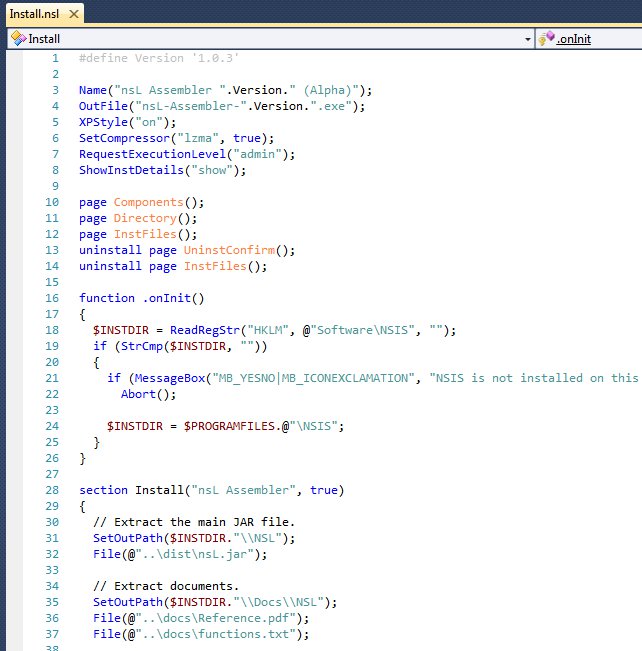
nsLanguage (nsL Assembler) support
nsL Assembler (nsLanguage) is a free high-level language for NSIS (* This feature is for NSIS Project only)
Visual & Installer is World's first editor which offers such functionality as syntax highlighting, code completion for nsLanguage!
With nsLanguage you can write your scripts faster, safer and in the same style as you used to write your code!
nsL is detected automatically and if installed then all *.nsl files in your NSISProject are compiled by this tool.
You can download latest version of nsLanguage from here (~700 kB) for free.
To have nsL Assembler working properly from Visual & Installer it MUST be installed into NSIS directory - the correct path to this tool should look like "${NSISDIR}\NSL\nsL.bat".
Some features of nsL:
- The nsL assembler takes nsL code and translates it into NSIS script which can then be compiled into an NSIS installation wizard.
- nsL has a uniform syntax that is similar to familiar programming languages such as C and Java.
- Complex expressions can be written freely while being assembled into basic NSIS instructions.
- Functions are defined and called much like they are in C and Java with the additional syntax for multiple return values.
- nsL introduces assemble time scope checking of variables as well as automatic declaration and support for global variables declaration and initialization.
- nsL also provides more powerful pre-processor directives such as macros which can have multiple inputs and outputs, just like run-time functions.
Full version control system support
If you are working on a large projects with multiple files, together with other people you know the situation: after some time without using Source Code Control (SCC) system the development chaos begins... It is possible to integrate various Source Code Control providers into Visual Studio: Team Foundation Server (TFS), Visual SourceSafe, CVS, SVN, etc. You can use them on your NSIS and InnoSetup Projects and your development will be smooth!
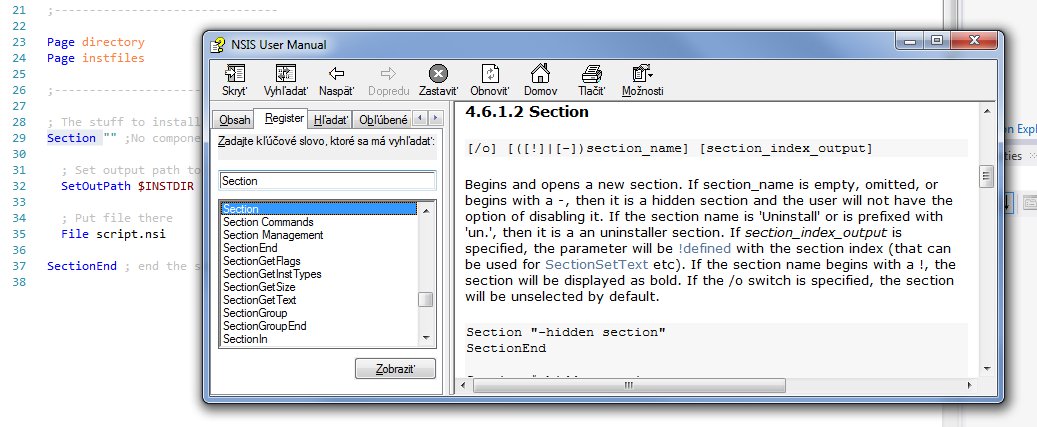
Dynamic help system
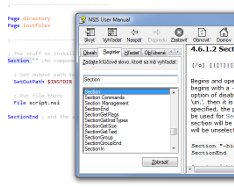
Visual & Installer is really high tied with Visual Studion and also with NSIS and Inno Setup. If you used to use dynamic help system in your preferred programming language you can use it also for NSIS language and Inno Setup language.
Simply press F1 anytime you need a help and appropriate help (manual file) will be opened. Dymanic help is of course context sensitive!
If you are not use about some parameter of you need more info about command then select it and press F1 - again manual is opened and selected item is immediately searched.
No more need for googling or looking for manuals is necessary. Save your time!
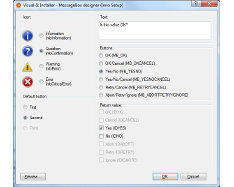
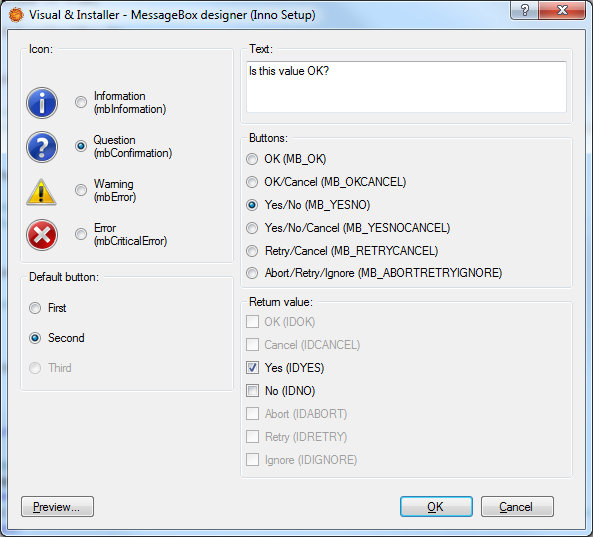
MessageBox Designer
Enables you to create (insert) MessageBox in your NSIS script or Inno Setup script.
With this handy feature you do not need to manually write the code but you only select design of your desired MessageBox and appropriate code is pasted on cursor position.
Save a lot of time! Simply Right click

MessageBox Designer
in Code Editor and select MessageBox designer.
In designer you can Preview the MessageBox so you immediately see how it looks like! Also you can define result - which button was clicked - and appropriate
code is generated
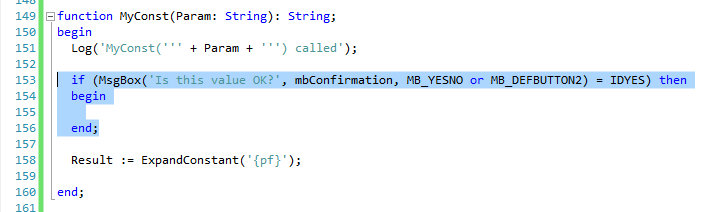
MessageBox Designer - code is generated
and pasted into editor.
![]() Tip:
The 'MessageBox Designer' item is not present in right click menu in Visual Studio 2015 and 2017.
Tip:
The 'MessageBox Designer' item is not present in right click menu in Visual Studio 2015 and 2017.
To use this feature from Visual Studio 2015 and 2017 run standalone application MessageBoxDesigner.exe in the installation directory.
Cross-version compatibility for all Visual Studio versions
When you create NSISProject or InnoSetupProject it is stored among other project types (C#/Visual Basic/C++/...) in your solution.
But Visual & Installer projects are designed with Cross-version compatibility for all versions of Visual Studio! (currently 2005, 2008, 2010, 2012, 2013 and 2015).
That means you can create the project (.nsisproj or .innoproj) in one IDE
(e.g. VS 2005) and open it later in another IDE (e.g. VS 2012) without any upgrade or conversion of project!
So you do not need to worry about "What happens when your IDE will become unsupported or outdated"!

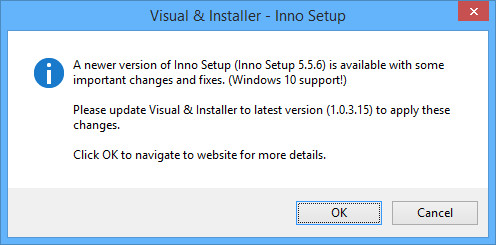
Version checking and updating
It is very important to keep your software up-to-date. The latest software release contains important fixes and updates which may prevent many troubles during your work with the software.
Visual & Installer offers version checking at Visual Studio start (can be turned On or Off in Settings dialog) and manual checking.
The updater reads latest version info from our servers and offers you to download and install new version (if available).
It also checks for latest NSIS and Inno Setup versions so you do not need to visit their websites!
Dark Theme(s) support
Many programmers who work with a computer on daily basis can confirm that looking at a monitor or display for a long time is killing their eyes. Especially the light white colors are bad. That is a reason why more and more people prefer dark themes above light ones.
Visual & Installer contains support for dark themes in Visual Studio. If the Dark Theme option is turned on (Default is Off) the Text Editor and appropriate dialogs (Find References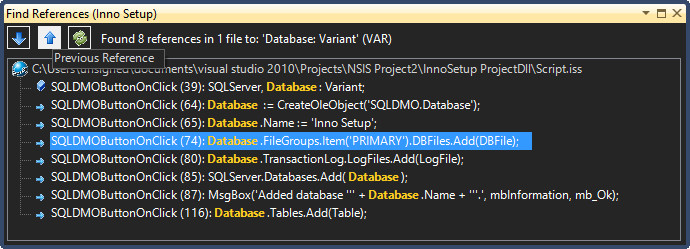
Dark theme in Find References dialog, ...) are drawn with dark colors which is very similar to High contrast option in Windows.
Dark theme is detected automatically during installation and you can adjust it in Settings dialog (which sets predefined colors for dialogs, syntax highlighting and other elements).
If you made any changes or you need to adjust colors simply configure them easily in Tools -> Options -> Environment -> Fonts and Colors dialog for
NSIS Language
NSIS Language,
and
InnoSetup Language
Inno Setup Language.
This feature works in all versions of Visual Studio, however older versions (Visual Studio 2005, 2008, 2010) do not support dark themes natively you need to install 3rd party extensions.
We recommend to use Visual Studio Color Theme Editor extension. Check this topic on StackOverflow.com for more details.
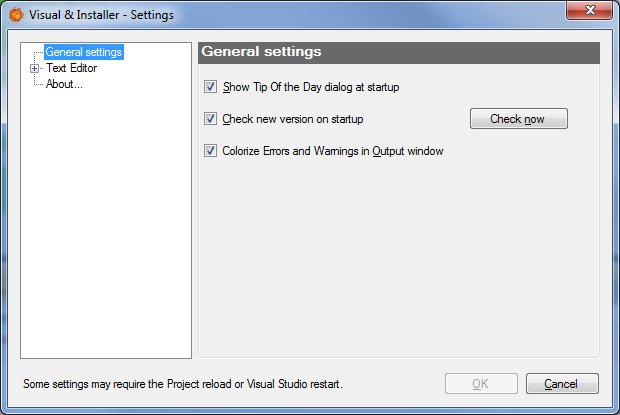
Visual & Installer Settings Dialog
In this dialog (click Visual & Installer -> Settings in Visual Studio's main menu) you can adjust most of the Visual & Installer properties. Certain options are common for both projects:
NSISProject and InnoSetupProject and some are for specified feature only.
If you can see text "This feature can be adjusted in Settings dialog." then you can adjust specific feature in this dialog.
Some settings may require the Project/Solution reload or Visual Studio restart.
Many of the settings have
link next to them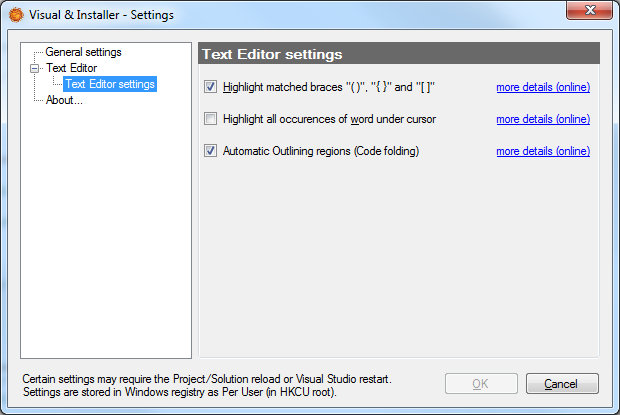
Settings dialog - links which will navigate you to the description of this feature (online manual).
Please notice that not each feature is present in all versions of Visual Studio. So certain options in this dialog may have no effect.
See the Visual Studio versions icons:
2005, 2008: 
2010:
2012, 2013, 2015:
2017:
2019:
2022:
or asterisk (*) for details.
Settings dialog is divided into three parts:
- 1. Tree with categories (in the left) - Visual & Installer options are divided into several categories. Each category covers different features.
- 2. Panel with options (in the right) - After you click category node in the Tree the right area is updated and appropriate options are shown.
- 3. Control buttons (at the bottom) - Use the OK button to save your changes. Clicking the Cancel button discards all changes and closes the Settings dialog.